Showing posts with label recipe. Show all posts

Thursday, January 15, 2015

Recipe: Easy Vegan & Gluten Free Peanut Butter Cups

If you follow me on Instagram, then you may have already seen and drooled over this picture. Peanut butter cups have been my favourite chocolate since I can remember, but store bought ones are usually loaded with a bunch of crap. Opting to make your own is great especially since it's so easy, you have control over what actually goes into them, and it's healthier (in moderation, of course). For the record, I made these for NYE and they were a hit. 

This recipe is completely customizable. Feel free to make any changes that you want and let me know what you changed up. Also, if you make these and post a picture to social media, tag me! I always love seeing what you guys try, whether beauty or food, based on my recommendations.


What you'll need:

  • 283 g of chocolate chips (I used Enjoy Life)
  • 2 to 3 tablespoons of coconut oil
  • approximately 1/2 cup of natural peanut butter (or whatever other nut/seed butter you like)
  • vanilla to taste (I used about 1 tbsp)
  • salt to taste 
  • maple syrup to taste (I used about 4-5 tbsp)
  • muffin tins and liners (about 12 to 15)

For the peanut butter filling:

Combine peanut butter, vanilla, maple syrup, and salt. Mix until well combined. Place in fridge until it hardens a bit, usually about 10 - 15 minutes. 

If you're using salted peanut butter, you could omit the salt. Since I don't measure anything out, start by adding in only a little sweetener of choice, salt, and vanilla, and taste it as you go along. You may want to add more or less of each ingredient to suit your taste buds. 


For the chocolate:

Combine chocolate chips and coconut oil. Stir frequently until smooth and melted.

To melt my chocolate I filled a pot with a bit of water, turned my stove top on low, and placed a stainless steel bowl over top of the pot. I then put the chocolate and coconut oil in. You're more than welcome to melt the chocolate however you like, of course.

To create the actual cups:

Line muffin tins with liners, then put 1 tablespoon (anymore and the ratio of chocolate to pb will be off) of melted chocolate in each. Place in freezer for about 7 minutes or until solid. Once solid, scoop as much filling as you'd like into each one, I used about a teaspoon, then pat it down leaving a tiny border around the edges (or don't! Whatever you like!). Cover with 1 - 2 tablespoons of melted chocolate* and place in freezer for 20+ minutes.

*If you'd like to top yours with anything, like I did, do it after putting melted chocolate over the peanut butter and before putting them in the freezer. I topped mine with coconut, cacao nibs, and toffee (not vegan but my boyfriend loves it).

And VOILA! These are so fun to make, you can definitely get your kids involved although you may need to double the ingredients as I sense they'll be eating more than helping. Also, I recommend storing these in the fridge as they taste so much better cold and will hold together better.

Bon appetit!

post signature

Saturday, February 15, 2014

Recipe: Peanut Butter Chocolate Chip Cookie Dough Bites

This recipe comes straight from Mama Earth Organics on Facebook. These cookie dough bites are damn delicious and I literally eat the batter as I'm making them....and then...the cookies once they're baked. I've attempted to bake them for longer than 10 minutes, but they just don't taste as good. You want them to be moist and literally like a cookie dough texture. 
 
Ingredients:

1 1/4 cups canned* chickpeas, well-rinsed and patted dry with a paper towel
2 teaspoons vanilla extract
1/2 cup + 2 tablespoons (165 grams) natural peanut butter (can use PB2 from gym to make healthier, check your labels)
1/4 cup (80 grams) honey (agave would be amazing too!)
1 teaspoon baking powder**
a pinch of salt if your peanut butter doesn’t have salt in it
1/2 cup (90 grams) chocolate chips

* My can was a 400 gram can, 240 grams without the water, and I used all but a few tablespoons

** If you need grain-free baking powder, you can use 1 part cream of tartar + 1 part baking soda + 2 parts arrowroot.


Directions:

Preheat your oven to 350°F / 175°C.

Combine all the ingredients, except for the chocolate chips, in a food processor and process until very smooth. Make sure to scrape the sides and the top to get the little chunks of chickpeas and process again until they’re combined.

Put in the chocolate chips and stir it if you can, or pulse it once or twice. The mixture will be very thick and sticky.

With wet hands (you must wet hands or it'll be a disaster which you can eat either way lol), form into 1 1/2″ balls. Place onto a piece of parchment paper. If you want them to look more like normal cookies, press down slightly on the balls. They don’t do much rising. Bake for about 10 minutes.

Yields about fourteen 1 1/2″ cookie dough balls.

*** Don't even try with regular peanut butter! They'll come out oily. You MUST use natural peanut butter (preferably organic).


NOM, NOM, NOM!!! I love how the peanut butter pretty much masks the taste of the chick peas, I doubt kids would be able to tell the difference. Let me know if you try these and any substitutions that you make.
post signature

Monday, February 03, 2014

Maple Dijon Vinaigrette Recipe

If you follow me on Instagram, then you may have already seen my salad pictures. I've been obsessed with this homemade salad dressing and therefore have been eating more salad than usual, not that that's a bad thing. Plus, I don't have a microwave at work so that limits me a tad. This is not my recipe, I actually got it from the Nature's Emporium Youtube Chanel, which you must follow because they have some amazing recipes on there!

Here's what you'll need:
  • 4 tablespoons olive oil 
  • 2 tablespoons maple syrup 
  • 2 teaspoons apple cider vinegar 
  • 1 1/2 teaspoons dijon mustard 
  • 1 clove of garlic
  • Sea salt and pepper to taste
I haven't tried switching out olive oil for a different oil or apple cider vinegar for lemon juice, I'm sure you could though. I also don't always measure when making this dressing. Sometimes I'll add more maple syrup, sometimes more acv or dijon, play with it.


You basically combine all of the ingredients in a mason jar, or whatever other container you have, and shake it up. Difficult huh? ;)


TA-DA! So easy. Serve over greens, quinoa, pasta, whatever you like. I love how this dressing is sweet and tangy all at the same time. For the record, I've also tried the sweet potato recipe (minus the cheese curds), from the video, and it was spectacular.

Let me know what your favourite homemade salad dressing recipes are below and/or if you give this one a try.
post signature

Monday, January 13, 2014

Maple Banana Oatmeal Recipe

Hello, hello! Today I'm coming atcha with THE most delicious oatmeal of life. Okay, maybe I'm exaggerating a bit, but it is really delicious. This has been my morning breakfast for weeks now and will continue to be my breakfast for the rest of the month. Then I'll get sick of it and move on, you know how it goes.

Disclaimer: I don't measure things out.

Here's what you'll need:
  • 1 tsp maple syrup (more or less depending on your sweet tooth)
  • 3/4 cup milk of choice (I use almond milk)
  • 1/4 cup quick cook steel cut oats
  • cinnamon to taste
  • pinch nutmeg 
  • any size banana you like!

Optional ingredients:
  • 1 to 2 tablespoons coconut oil
  • 1 to 2 tablespoons Chia Goodness or plain chia/flax/hemp/etc
  • nuts (which I didn't use)

 Combine milk, nutmeg, cinnamon and maple syrup in a pot over medium heat.


Just before it begins to boil, add in the coconut oil and chopped banana. Stir.


When it boils, add in oats and stir. Reduce heat and cover, stirring occasionally.


After 5 minutes, I let it sit for 1 minute. Then I put it in a boil.


Add Chia Goodness, the Original version tastes better with this recipe, and stir. I love Chia Goodness because of the combination of seeds that it contains, it gives the oatmeal an extra boost of protein and nutrition.


Then I top with blueberries and sprinkle with even more cinnamon! You can add any fruit you want or omit it completely.


There you have it my loves, Maple Banana Oatmeal! 

Let me know if you try out this recipe or a slightly different variation of it. Also, I'd love to hear your favourite oatmeal combinations.
post signature

Monday, July 15, 2013

Best Smoothie/Juice Ever - My Fave Recipe

I have been juicing ever since my parents got the NutriBullet, a few months now. While I love trying new juices, I tend to stick to ingredients that I enjoy eating. If I won't eat it, I won't drink it! Simple. Lately, I've been making this one particular juice that I just can't get enough of. It's delicious, nutritious, and easy to make.

What's in it?

  • 1/2 banana
  • baby spinach
  • baby kale
  • frozen fruit
  • water
  • raspberry lemonade (this is what makes it taste soooo good)

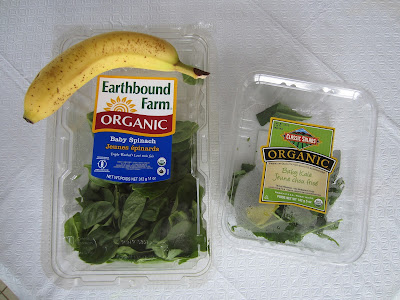
I prefer baby spinach & kale, but you can buy them by the bunch if you prefer


I don't measure anything, I just pack it all in the little NutriBullet cup and hope for the best. Put 1/2 banana, kale, spinach, water and lemonade.
This shows how much water I put. I then put lemonade to the MAX line.
 BLEND!


Totally forgot to take a picture, but I put about a handful of frozen berries in and blend again.


TA-DA, brown unappetizing looking smoothie! lol. I have since (today, literally) made this with just 1/2 banana, baby kale, baby spinach, 3 mint leaves, water and splash raspberry lemonade and it is even MORE delicious!!!!!!! I didn't think it was possible. It's extremely refreshing, detoxifying and just the perfect amount of sweetness.

Let me know if you've tried this and/or what your favourite smoothie/juice recipes are.
Related Posts Plugin for WordPress, Blogger...